Here you’ll find offensive basketball plays utilizing the zone offense formation. Just follow the key to understand the diagrams and follow along with the text descriptions. Practice, practice, practice until you can run these plays in your sleep. Only after hours and hours of perfect practice will you be ready to DOMINATE!
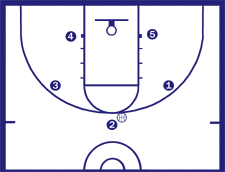
Key
1 = Point Guard
2 = Wing
3 = Wing
4 = Post
5 = Post
Red Dotted Arrow = a pass
Black Straight or Squiggly Arrows = player movement
Each zone offense play is separated by a horizontal line running across the page.
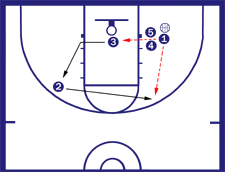
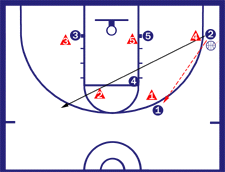
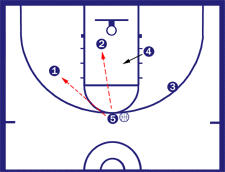
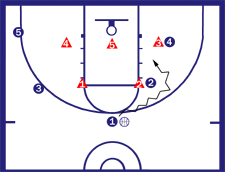
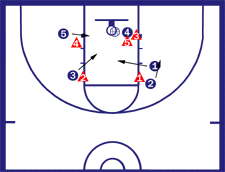
Zone Offense Formation: Easy
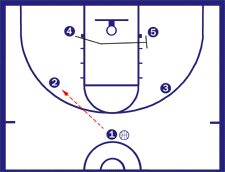
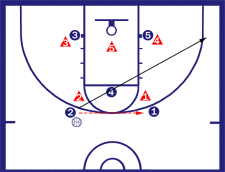
Zone Offense “Easy” plays will give your team several chances to get to the basket. This zone offense play gives player 1 an open shot. But if that doesn’t work, we have some more choices to clear the situation. 1 passes to 2. This is the signal for 4 to go to the weak side.
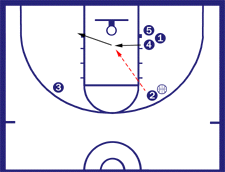
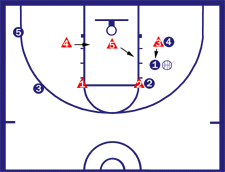
1 runs through the zone (there is a chance for a give and go with 2) and gets behind players 5 and 4. 3 steps a bit higher to receive the pass from 2.
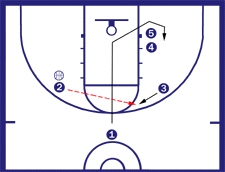
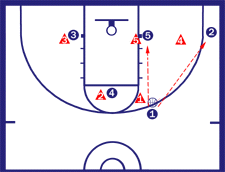
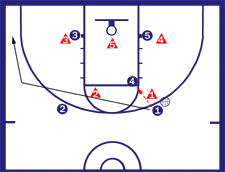
When 1 gets behind the screen, he receives the pass from 3. Now 1 has the chance to take the shot.
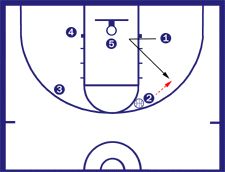
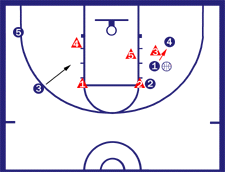
If 1 cannot shoot, 3 drives through the zone.
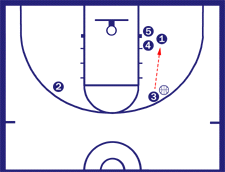
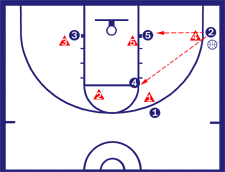
1 can now pass to 3. 2 takes the old position of 3. If 1 cannot pass to 3, he can now pass back to 2. 3 gets out of the zone to the weak side and gets to the old position of 2.
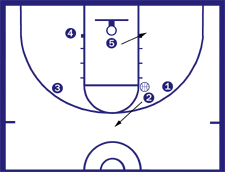
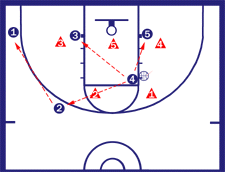
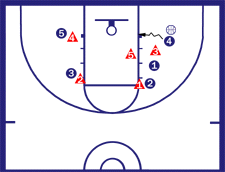
4 now clears the screen and gets into the zone. 2 can now pass to 4. If 4 is not open, which is mostly the case, 4 gets to the opposite side.

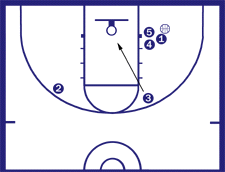
Then 5 gets into the zone and 2 has the second chance to pass into the zone.
If 5 is not open, 1 can cut to the forward position on the right side and receive a pass from 2.
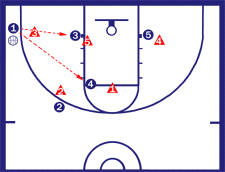
If nobody is open, 5 returns to his old position and 2 slides over the very top.
Now we are back in the starting positions and we can try to play the same on the other side.
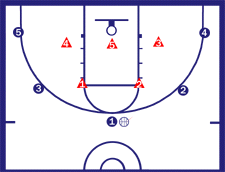
Zone Offense Formation: 2 – 1 – 2
For this zone offense play, set up in a two-one-two. Have the 4 at the high post, 5 and 3 will play on the block.
The defense has shifted on the pass from 2 to 1. D2 has to cover the high post and now D1 has the ball. 1 has a few options here, if D4 extends out too far, then 5 can post up on D5. If D4 stays in, then 1 can pass to 2 for a shot if open. If 2 shoots the ball, then we have rebounding coverage with 3 on the backside, 5 ball side and the 4 in the middle.
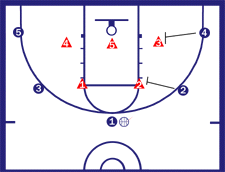
The pass is made to 2. Now D2 is at a disadvantage by being behind 4. If D1 stays out on 1, then 2 has the option of passing to 5 or look to hit 4 at the high post.
To reverse the ball, 2 will pass the ball back to 1 and cut back to the opposite wing up high.
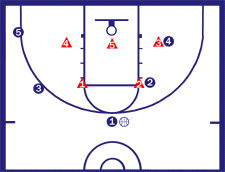
With D1 having to guard 1 and with 2 cutting high we hope that D2 will cover the cutter. This will leave 4 open at the high post. 1 will pass to 4 and cut to the corner.
4 has the ball and the defense should collapse. 4 will look down low to see if 5 or 3 are open under the basket. This depends if D5 comes up to cover 4. If so, then a scoring opportunity exist. If nothing there then 4 will pass out to 2 then to 1. In this case: 2 receives the pass from 4. 1 receives the ball from 2.
The 1 has the option to pass into the low post to 3 or high to 4. If 1 has a shot, then we should have good rebounding coverage.
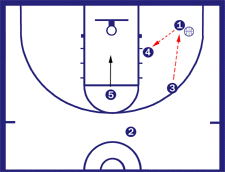
Zone Offense Formation: #2
For this zone offense play, 1 brings the ball over half court to start the play in motion. Once 1 has dribbled over the half court mark, 4 sets a pick for 3 to break out to the wing and 5 flashes to the free throw line for the pass. The first option should be 5.

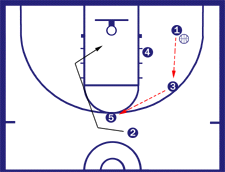
If 5 is not open for the pass then 1 will pass to 3. When the pass goes to 3, 2 will set a pick for 1 for the break to the basket. 4 is posting hard at the block for a possible pass and 5 is the security blanket for the entire play. If 3 gets stuck and doesn’t have anyone to pass it to he can always go to 5 and the play continues the exact same way. The option to 4 is always there depending on his willingness to “duck in” or half flash to the ball.

Depending on who has the ball. The pass to the cutter can come from the 3 position or the 5 position. It doesn’t matter because the play will continue from either pass. The option for 4 is always there… it depends on his willingness to “duck in” or half flash to the ball.
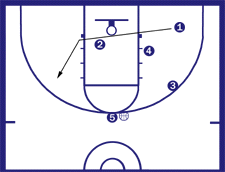
If 1 doesn’t receive the ball on the cut he will continue to the baseline. Let’s say that 3 had the ball but couldn’t make that pass to 1 on the cut. 3 will pass the ball to 1 at the baseline for a shot. 1 has the option to shoot the ball or pass to 4 at the block. 5 will always flash down a bit for a consideration pass in the paint. What if neither option is open?
1 didn’t have a shot and couldn’t pass to 4 at the block, he swings the ball back to 3. 5 pops out to the 3 point range to swing the ball and passes to 2 on the cut to the basket.
2 and 1 are cutting at the same time in different directions. The play may never get this far at some age brackets but it is good to see the ending.
The pass could come from 5 to 2 or 1. The option to 4 is always available. And 5 has the option to shoot.
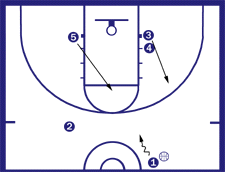
Zone Offense Formation: Corners
This zone offense play is designed to give you a variety of options and can be used against any 2-1-2 or 2-3 zone. The players are spaced out along the perimeter which will prove to be important.
This play has two sides to it. The point guard can call this play and say “left” or “right” to run it on either side. In this example, we are running it on the right. 2 and 4 screen the nearest defender. 2 screens a high defender, 4 screens the low post defender. 4 should look to post up the defender if he is open. Make sure to set good screens because this is possibly the most important part of the play.
2 and 4 complete their screen. 2 should try to screen the defender with good position so he can’t stop the point guard.
The point guard dribbles around the first pick and continues until stopped by the defense.
The defense shifts over and stops the point guard. At this point 4 will be open.
The point guard has a few options here. An entry pass into 4 for an open layup or short jumper. Look for 3 and pass to him for a mid range jumper. 2 will be wide open if the defender he screened tries to stop the point guard. The point guard is in good position for a jumpshot. The main option is the entry pass to 4.
4 can dribble into the key and shoot an easy layup. If 4 gets to far under, power out and then shoot. Look to draw the foul. Use pump fakes.
All five players on offense should be able to get into a good area for the rebound. Important tips: Coaches should teach all options of this zone offense play to their players. Emphasize good screens. Players will learn to roll off their screens.