Here you’ll find offensive basketball plays utilizing the triangle offense formation. Just follow the key to understand the diagrams and follow along with the text descriptions. Practice, practice, practice until you can run these plays in your sleep. Only after hours and hours of perfect practice will you be ready to DOMINATE!
Key
1 = Point Guard
2 = Wing
3 = Wing
4 = Post
5 = Post
Red Dotted Arrow = a pass
Black Straight or Squiggly Arrows = player movement
Each triangle offense play is separated by a horizontal line running across the page.
Triangle Offense Formation: Principles
In the triangle offense all players must both understand and be able to play all positions (point guard, strong-side wing, weak-side wing, corner position and post positions) regardless of their size or atheletic ability. Spacing is the most crucial parts of the triangle offense. 15′ is the optimal space between players. This allows for more effecient passing. The shape of a triangle is formed on the ball side by the post player, the wing player and the corner man. The triangle can be formed on either side; it can be initiated by either a pass from the point guard to one of the wing men or by the point guard dribbling over to one of the wing positions. Whichever player ends up with the ball in the strong-side wing position becomes the “trigger man” – what he does with the ball determines the offensive movement.
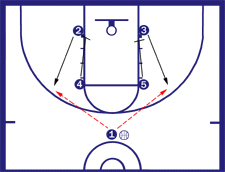
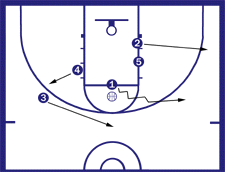
The triangle offense begins with 4 and 5 located at the high post positions and the two wing players on the lower blocks, as shown. When the point guard reaches the bottom of the mid-circle, 4 and 5 then downpick for 2 and 3 to get them open in the wing areas for a pass from 1.
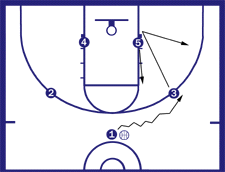
You can also begin the triangle with 1 dribbling to either wing position with the wing player then v-cutting down to the corner position and the strong-side post player moving to the high-post elbow position.
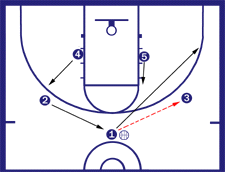
In this example, where 1 has passed to 3 on the wing then cut through to the corner, the triangle is set on the right side with 3 on the wing as the trigger man, 1 in the corner and 5 in the ball-side high post area. 2 moves up to the point area for defensive protection and 4 moves out to the weak side wing area. Now the triangle offense is set.
Triangle Offense Formation: Circle
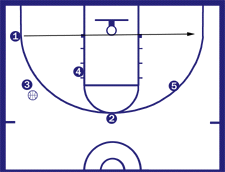
In the “Circle Option” the trigger man or the point guard calls out “CIRCLE” causing the corner man to run quickly and “circle around” to the opposite side corner. Here, 3 is the trigger man. Upon calling out “CIRCLE”, 1 runs to the opposite corner leaving 3 and 4 alone on the left side.
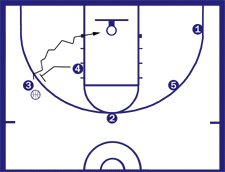
You now have a 2 on 2 game. 4 then sets a screen on the baseline side of 3’s defender, then rolls to the basket after setting the screen. 3 dribbles off the screen from 4 and can either look for his own shot or pass to 4 rolling to the basket. 1 and 5 look to CRASH the boards if a shot is taken. 2 stays at the point for defensive protection.
Triangle Offense Formation: Corner
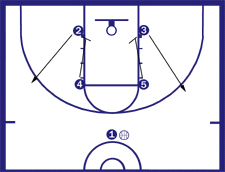
The corner option always begins with the two post men down-screening for the wing players. 2 & 3 come off the screens out to the their respective wing positions.
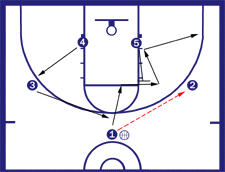
1 passes to the open wing (who then becomes the “trigger” man). 5 steps up and sets a screen at the elbow for 1 who v-cuts off 5’s screen looking for the pass from 2 for a layup. If 1 does not get the ball he v-cuts out to the corner area and 5 remains in the high post elbow area. 3 then replaces 1 at the point position and 4 goes out to the opposite wing area.
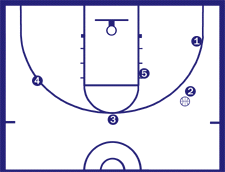
Now the triangle offense is established on the right side with 5 in the high-post area, 1 in the corner, and 2 who is the trigger man with the ball – what he does next with the ball will dictate the appropriate offensive movement. 3 has now moved up to the point for defensive protection and 4 has moved out to the weak side wing area.
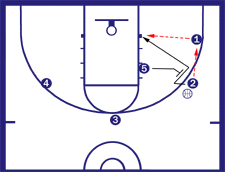
The corner option now is where 2 passes to 1, 5 then steps up to set a screen on 2’s defender, and 2 v-cuts off of 5’s screen looking for the pass from 1 for a layup.
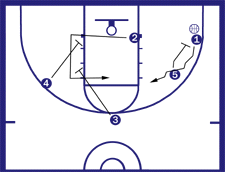
If 2 does not get the ball he goes through the lane to the weak side where 4 and 3 are coming down to set a double screen on 2’s defender. 5 then steps up to set a screen on 1’s defender. 1 dribbles off the screen and has the following options: 1) jump shoot, 2) pass to 5 rolling to the basket after setting the screen, or 3) pass to 2 inside the free throw line coming off the double screen from 4 and 3.
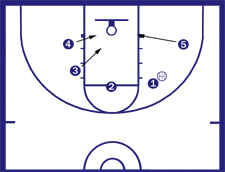
4 and 3 must read what 1 decides to do. If 1, 2, or 5 get the shot then 4 and 3 must CRASH the boards. 2 or 1 must be sure to stay back for defensive protection.
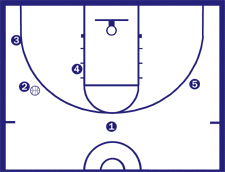
If neither 1, 2 nor 5 get the shot then 4 sets up at the high-post area, 3 moves out to the corner and 2 becomes the wing trigger man. 1 passes to 2 to set up the offense, then goes to the point for defensive protection. Now the triangle has been established on the left side of the floor to begin the offense again. The trigger man, 2, will now control the offensive movement by what he decides to do with the ball. 1 stays at the top of the key and 5 takes the weak side wing position.
Triangle Offense Formation: Post
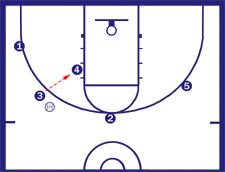
3, now the trigger man, passes the ball to 4 who in now at the high post position.
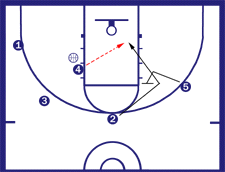
4 pivots, and in a triple threat position faces the basket. Meanwhile 5 provides a backscreen for 2 who is cutting to the basket. 4 can either pass the cutting 2, take a jump shot himself or drive to the basket for a lay up.
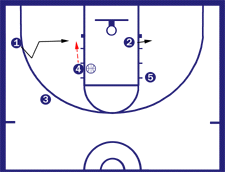
4 also has the option to pivot around facing away from the basket. Now he can dish a back door pass to 1 who is now cutting to the basket for a lay up. 2 must clear out to just outside the low post position, keeping his defender away from the basket.
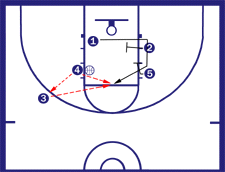
When 1 does not receive the pass from 4, he will continue through and around the double screen that 2 and 5 create for him. He will finish up right below the free throw line where he will either get a pass from 4 or if 4 passes to 3, 3 will pass to 1 for the open shot. 4, 2 and 5 will look for the rebound while 3 remains back for defense.
If 1 has no shot, he will then dribble out to the right wing position. That will signal 3 to head to the top of the arc while 4 heads to the left wing and 2 to the right corner.
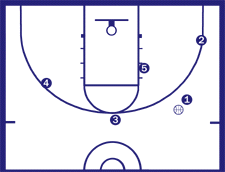
Now the triangle offense has been reset on the right side. 1, being the point guard and trigger man, will decide where to go with the play next.
Triangle Offense Formation: Reverse
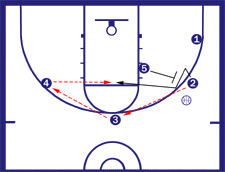
2 is the trigger man in this play that starts with the triangle being on the right side. 2 passes to 3 who immediately passes to 4. At the same time 3 is receiving the pass and then passing 5 shoots out to set a screen for 2 who v-cuts and flashes to the top of the key. 4 passes to 2 who looks for the open shot. If he shoots all players except 3 crash the boards. 3 stays back for defense.
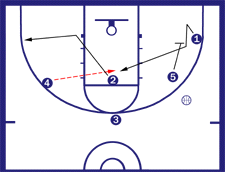
If there is no passing lane from 4 to 2, 2 will continue through to the left corner. 5 will cut down and screen 1’s defender so that 1 can v-cut and flash to the lane for the pass from 4 and the shot. If he shoots all players except 3 crash the boards.
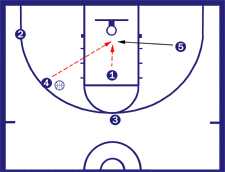
If 4 cannot get the pass to 1, he can also pass to 5 who has now cut to the basket after screening 1’s defender. If the pass was made to 1 but he had no shot he also can pass to the cutting 5. Whether he gets the pass or not 5 positions himself to get the rebound.
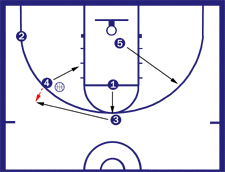
3 will now scoot over to the left wing, taking the hand off from 4. 4 slides down the high post position. 5 moves out the weak side wing and 1 goes up to the point area. The triangle is now reset on the left side.
